Friday, February 03, 2006

Furniture Design : An Ottoman

A couple months back, my wife and I were starting to make our living room 'child friendly' so that our baby would have more room to play. We wanted to get rid of the large coffee table which had some hard edges. We also had somewhat limited seating in the room, and wanted to add some seating space for when we had guests.
I designed this pair of ottomans ( or is it ottomen ? I never know ) as a solution. The construction itself is pretty basic, but I like how they turned out. I was looking for clean, modern lines, with a piece that was somewhat child friendly .

Construction:
I neglected to take during construction pictures, so my scintillating narrative will have to do ! As penance, I offer to draw up plans for anyone who's interested in making their own !

The construction itself is pretty simple. A box made out of 3/4" MDF board, with simple butt joints held by glue and screws. The base is 1/4" plywood. The Ottoman has storage inside. The top is a 1/2" MDF with a high density 4 foam sheet 4"thick as the seat.

Why all the MDF ? Basically this was one of my first projects that wasn't from a plan and I wasn't sure how it would turn out. I wanted to choose the cheapest possible option. If I were doing this again , I'd probably consider something lighter like 3/4" plywood, maybe even OSB. ( oriented strand board, this is the stuff they use for construction, so its relatively cheap) At any rate, it was going to be upholstered, so I knew the look of the wood didn't matter much.

Notice the fully hidden cabinet hinges and the anti-slam hinge in the center. I wanted a clean look from the outside, so I didn't want to use something like a regular piano hinge. The anti-slam hinge is a must for all furniture where lids come into the same vicinity as little delicate hands.

The upholstery :
I covered the sides of the table with polyester batting that was about an inch thick, uncompressed. Polyester cloth on the top for easy maintenence. The maroon cloth on the sides is a cross between corduroy and velvet .. its called 'moleskin'. ( Yeah .. You have to pay a visit to a un-macho store like Joanne Fabrics to get the materials. Heads turned as I was probably the only guy in the store.. But the ladies were kind and helpful and only snickered slightly when I referred to the maroon as 'dark red' :-)

All that material, a good hot glue gun -- And you are in business. Finally I got some 1/8" plexiglass and the ottoman becomes a good side table.

Epilogue:
We use both of the Ottomans a lot. One holds my son's toys, the other his books. His first order of business every morning is to ask us to open both up and systamatically pull out everything thats inside !
It was a really simple -- almost crude -- construction. Knowing that the little fingers are safe under the lid and that the padded sides will cushion the little falls -- thats what really makes these pieces for me. I guess sometimes, designing furniture isn't about the furniture.

Monday, January 23, 2006

Repairing a heating system zone valve

We woke up at 5AM yesterday in a sweat.
This is somewhat unusual -- this time of the year, its freezing outside and 5AM on a Sunday is the time to stay in the warm comfort of the bed, preferably deep asleep. Not so on this eventful Sunday, as I mentioned. I got out to check the thermostat - and it was showing a balmy 87 degrees ! ( the cost of the gas bill made me sweat a little more ;-)

Diagnosis:

A 30 year old heating system -gas fired boiler with forced hot water, and 2 zones.
  1. My first thought was : Bad thermostat. So I turned the thermostat all the way down. No difference, the heat continued to rise.
  2. Then I went downstairs to check the temperature there -- the lower level ( a separate heating zone) was fine. Hmm .. Back upstairs, I turned the thermostat off. Still no difference.
  3. I pulled the thermostat out from the wall and disconnected it completely. ( I did tape the wire to the wall and insulate the ends with some electrical tape :) Still no difference to the heater, which kept heating like there was no tomorrow. A kitchen thermometer showed 90 degrees. Now I was getting worried, so I went down to the basement and shut off the boiler using the master switch. Ok .. Now to go back to the diagnosis with a cool head, so to speak.
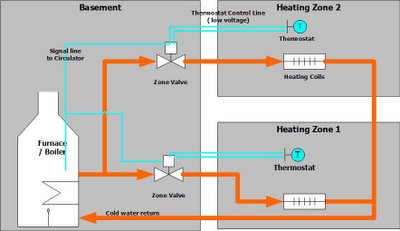
Here's roughly what my heating system looked like : A zone valve.
The hot water pipe coming out of the boiler forks to feed my 2 heating zones. There are solenoid valves at the fork that control the flow of the heated water into the coils. The 2 wires from each of the thermostats from the heating zones connect into these 'zone valves'.
A third wire from the zone valve connects to the circulator in the boiler to tell it turn on when the valve is open and heat is required.
So my process of elimination looked like this :
  • If the furnace or the circulator had a problem, both zones would be affected. Since my overheating problem was limited to the top zone, clearly the issue was in the circuitry for that zone.
  • I had already disconnected the thermostat - so the only other possibility was the zone valve. Mine is a brand called Taco.

Repair:

Cool, huh ? Now to see if we can actually do something about it.

I drove over to the local borg ( big orange retail giant :) The folks there are usually pretty helpful -- so I took along a picture of the suspect valve on my cellphone (that's the first picture on the post). Maybe it was the Sunday staff, or just the luck of the draw, but the gentleman in this case gave me the standard speech on how not to touch your heating system unless you are licensed.
Hmm .. back to the web! I found a couple of useful posts :
So back to the borg I went. A little looking and I found the valve -- it had sweat joints, not something I have worked on before -- specially near gas boilers !
A little more looking and I see that they stock the solenoid portion of the valve (the powerhead) separately. The valve itself seems very solidly built, all brass -- so chances are that my solenoid has failed. It looks like a very easy fix -- 3 wire connections and the solenoid itself has a twist-fit connection to the base.

Back home, with the furnace still switched off I replaced the powerhead. Basically :
  1. Label the 3 wires , then disconnect and immediately insulate ends with electrical tape.
  2. Twist the old powerhead about 30 degrees clockwise to remove. It comes off quite easily. Looking inside -- it was actually quite corroded.
  3. Clean the seat thoroughly with some penetrant oil.
  4. Twist fit the new powerhead on. Connect the 3 wires, taking care not to short anything.
  5. Turn on the system and test operation by turning the thermostat up and down !
Total cost of project : about $70
What it might have cost : Around $300 - $400, based on some estimates I found, possibly more since it was a weekend.

Thoughts / Comments / Any other heating system tips you'd like to share ? Let me know !
Disclaimer :
I shouldn't have to say this, but I am not a mechanic or licensed or certified! ( See the definition of dabbler! ) The story above is for your reading pleasure, so please don't attempt to duplicate unless you know what you are doing.

Why this blog ?

Ever since I started using the using the Internet, I have used it to research information on many different areas. The net has given me pointers, perspectives, advice and oh the odd rant ;) on

  • making a solid wood joint,
  • finishing a table
  • upholstering an ottoman,
  • sharpening the mower blade,
  • home wiring,
  • home plumbing,
  • maintaining my car
  • and numerous miscellaneous other things ...
Since its the collective wisdom of the net ( and that, of course, of friends ) that enables me to dabble in these areas, I figured it was time to start posting some of the results of those exploits and share with fellow handymen ( and women ! ) some of the projects that I have been doing.

Do pitch in with your own comments, favorite hints and tips!

Welcome !

This is officially my first blog post ! Add blogging to the list of odd jobs that this handyman dabbles in :-)